Picktorial Photo Editing
Picktorial is a great tool for enhancing and improving your photos by providing both flexibility and ease of use when editing your photos.
Photo enhancement in Picktorial can be done using several tools, each allowing a unique way to control the look of your photos. To access these tools make sure that the inspector pane is shown or choose View > Show Image Inspector from the main menu. In this section, we will explain how to use each of these tools but we recommend that you try playing with them to get a feeling of how the tools affect your photos.
Basic Editing Tools
Edits in Picktorial are applied non-destructively. That means that you can always refine your edits, even after making further changes and without undoing the latest ones. Of course, you can also revert to the original by clicking the Reset Adjustments button at the bottom of the inspector.
The editing tools are grouped into sections: Presets, Crop & Rotate, Light, Color, Curves, Retouch, Overlay, Frame and Info. To open a section, click on its title or icon. Some of the tools are pretty straight-forward, (notably, the ones that are purely slider-based), while others may require a bit of guiding or trial-and-error experiment.
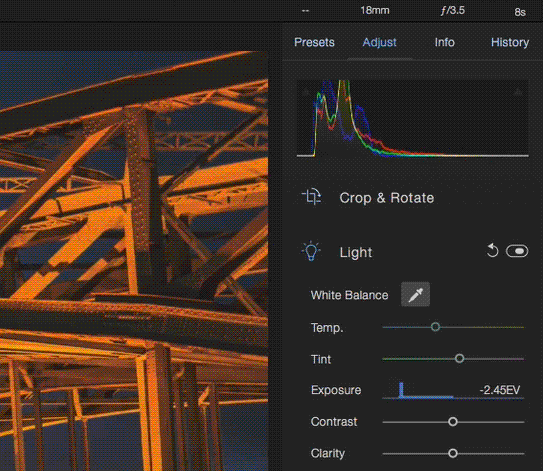
At the top of the Adjust tab, you will find the histogram. The histogram displays the distribution of the color intensity at each of the red, green and blue channels of the image.
Light Adjustments
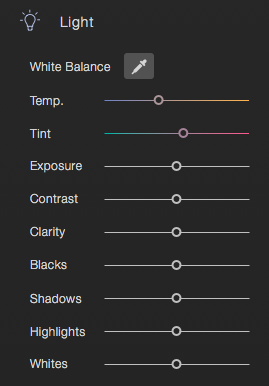
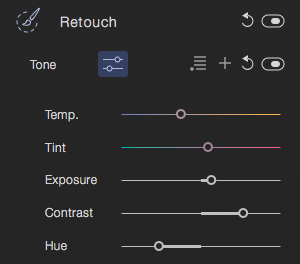
Picktorial offers several tools to adjust the lightness and color of the image, located in the Light and Color sections. Starting from Picktorial 2.2, the same tools are also available as local adjustments as part of the Retouch > Tone tool. Here we will go through the various color and light tools.
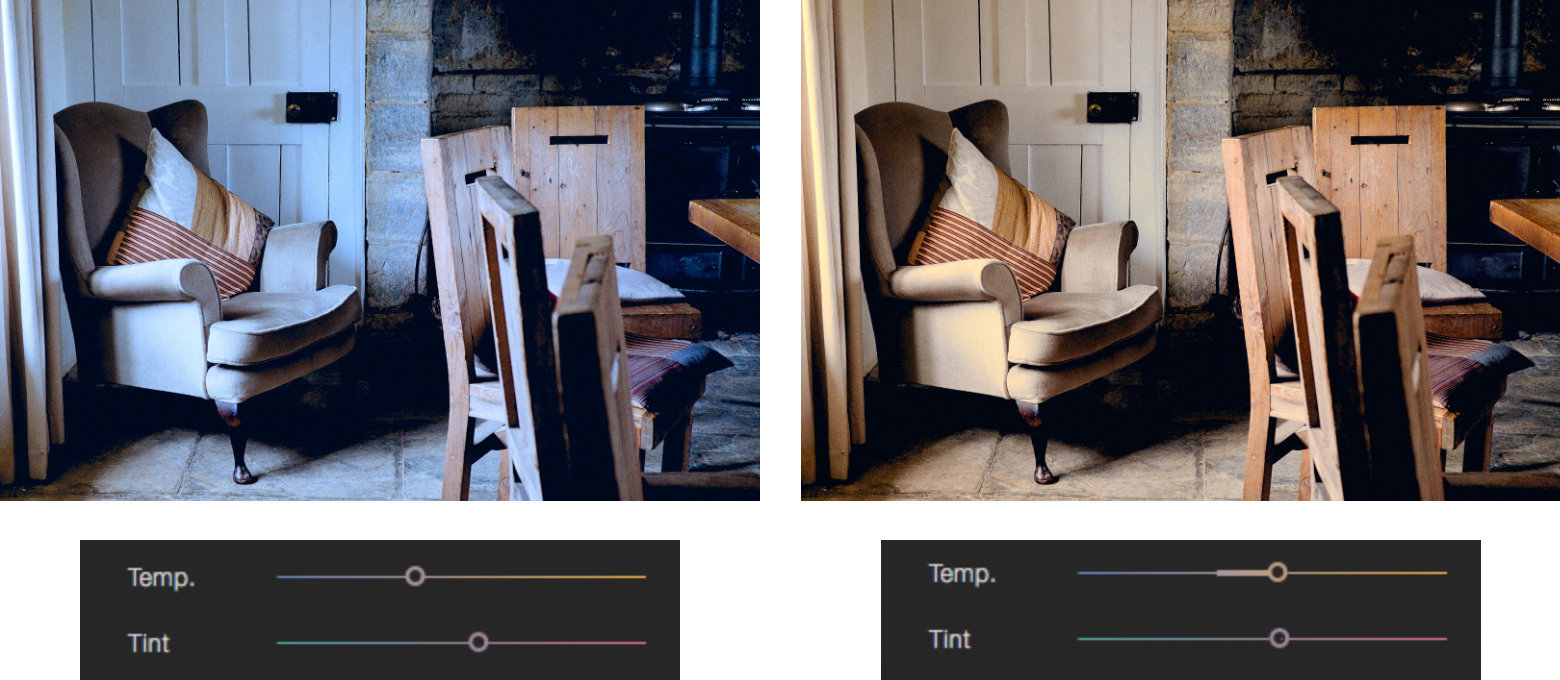
Temperature and Tint
Different light sources (daylight, tungsten, bulb, fluorescent, etc.) emit light in different colors (spectrum) and affect the overall color of the scene when taking a photograph. While the human vision system can compensate these differences easily when we are in the scene, these color casts are often noticeable when we view photographs in different lights than they were captured under.
Modern cameras can often fix this automatically, but when they fail, you can use the Temperature and Tint sliders by dragging them left or right according to the specific look of the image. You can also use this slider to achieve an artistic look for your images.
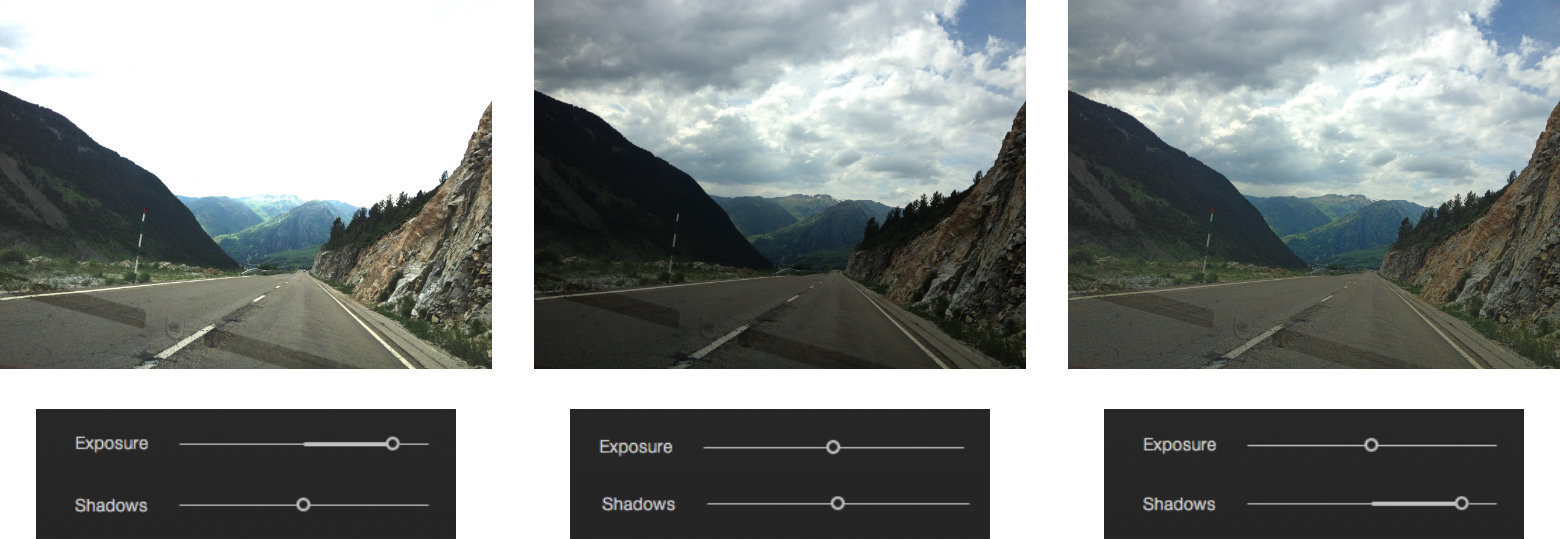
Exposure
Using the Exposure tool you can brighten or darken the image. This tool artificially changes the image as if the exposure time of the camera was different when capturing the photo. For a deep understanding of the exposure notion, see Exposure (Photography) in Wikipedia.
Move the Exposure slider Exposure to the right for brightening your photo or left to make it darker.
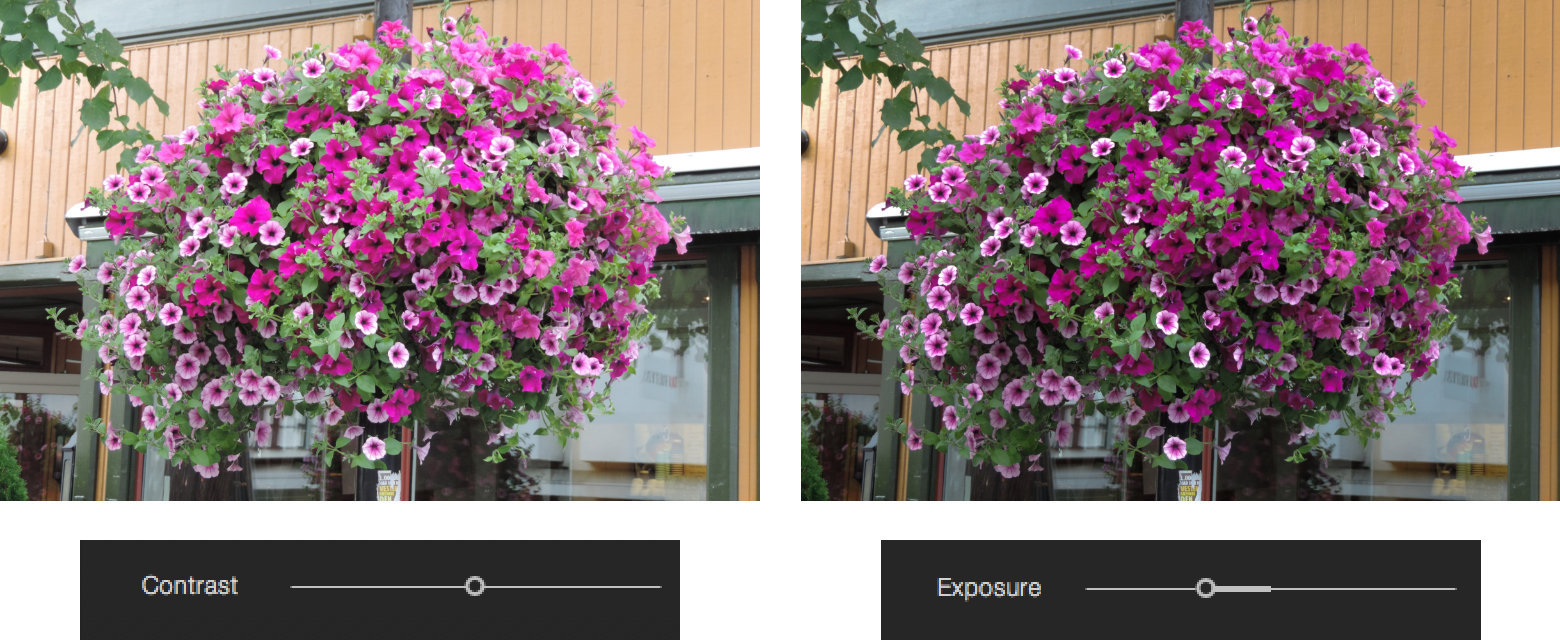
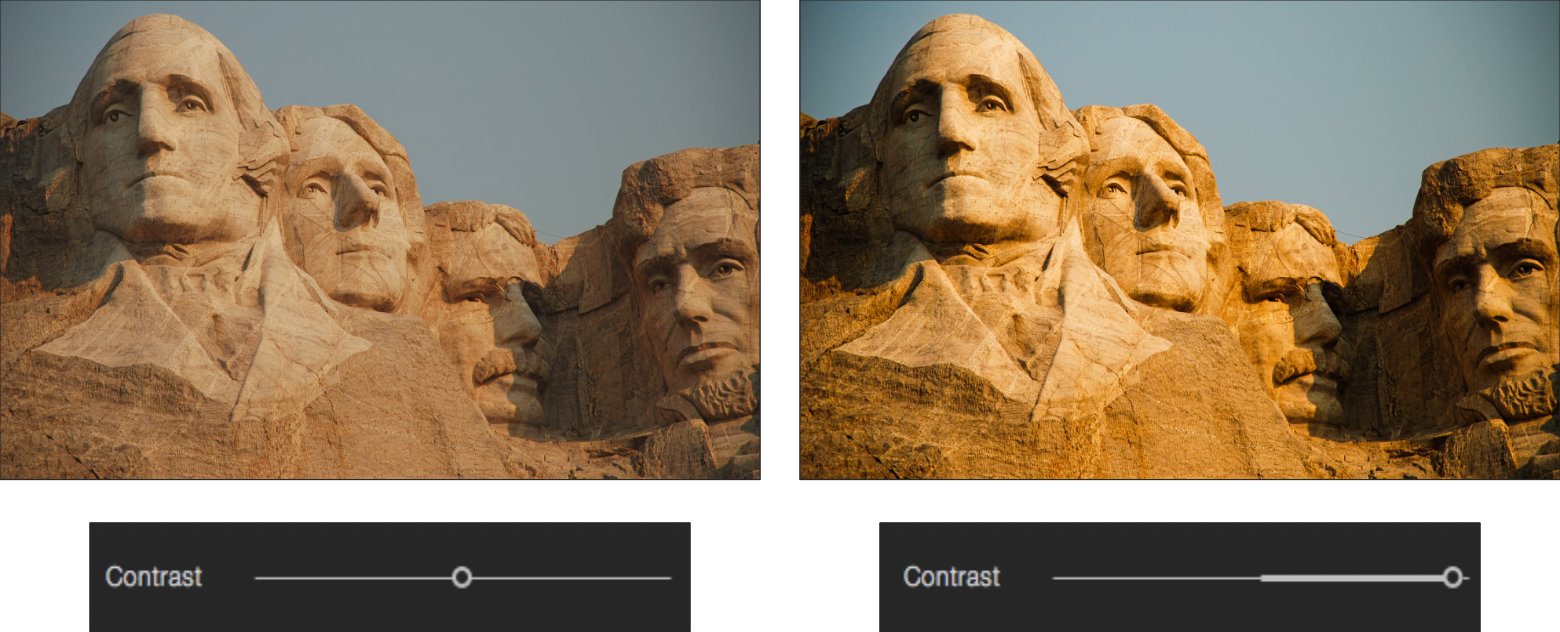
Contrast
Using the Contrast tool you can make the difference in luminance more (or less) distinguishable.
Move the Contrast slider to the right or to the left for increasing or decreasing the photo contrast.
Clarity
The
Move the Clarity slider to the right or to the left for increasing or decreasing the photo Clarity.

Highlights and Shadows
The Highlights and Shadows sliders allow you to separately adjust the brightness of bright and dark regions. This is helpful in the common scenario where a part of the image is too dark or too bright, but the other parts of the image should not become darken / brighten.
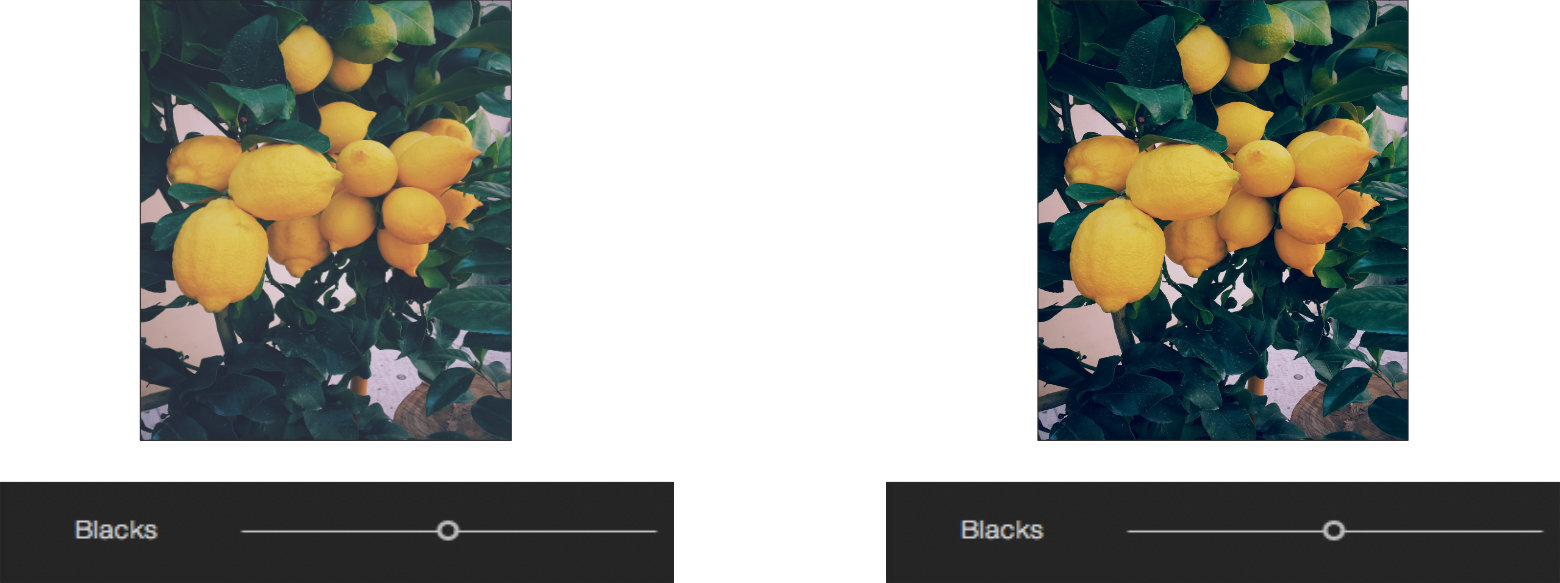
Blacks and Whites
The Blacks and Whites sliders allow you to adjust the very dark and very bright pixels. It may be useful to turn on the clipping overlay (from the View menu, or by pressing Alt Shift H) when adjusting these sliders to make sure that no important pixels left out of the working color space dynamic range.
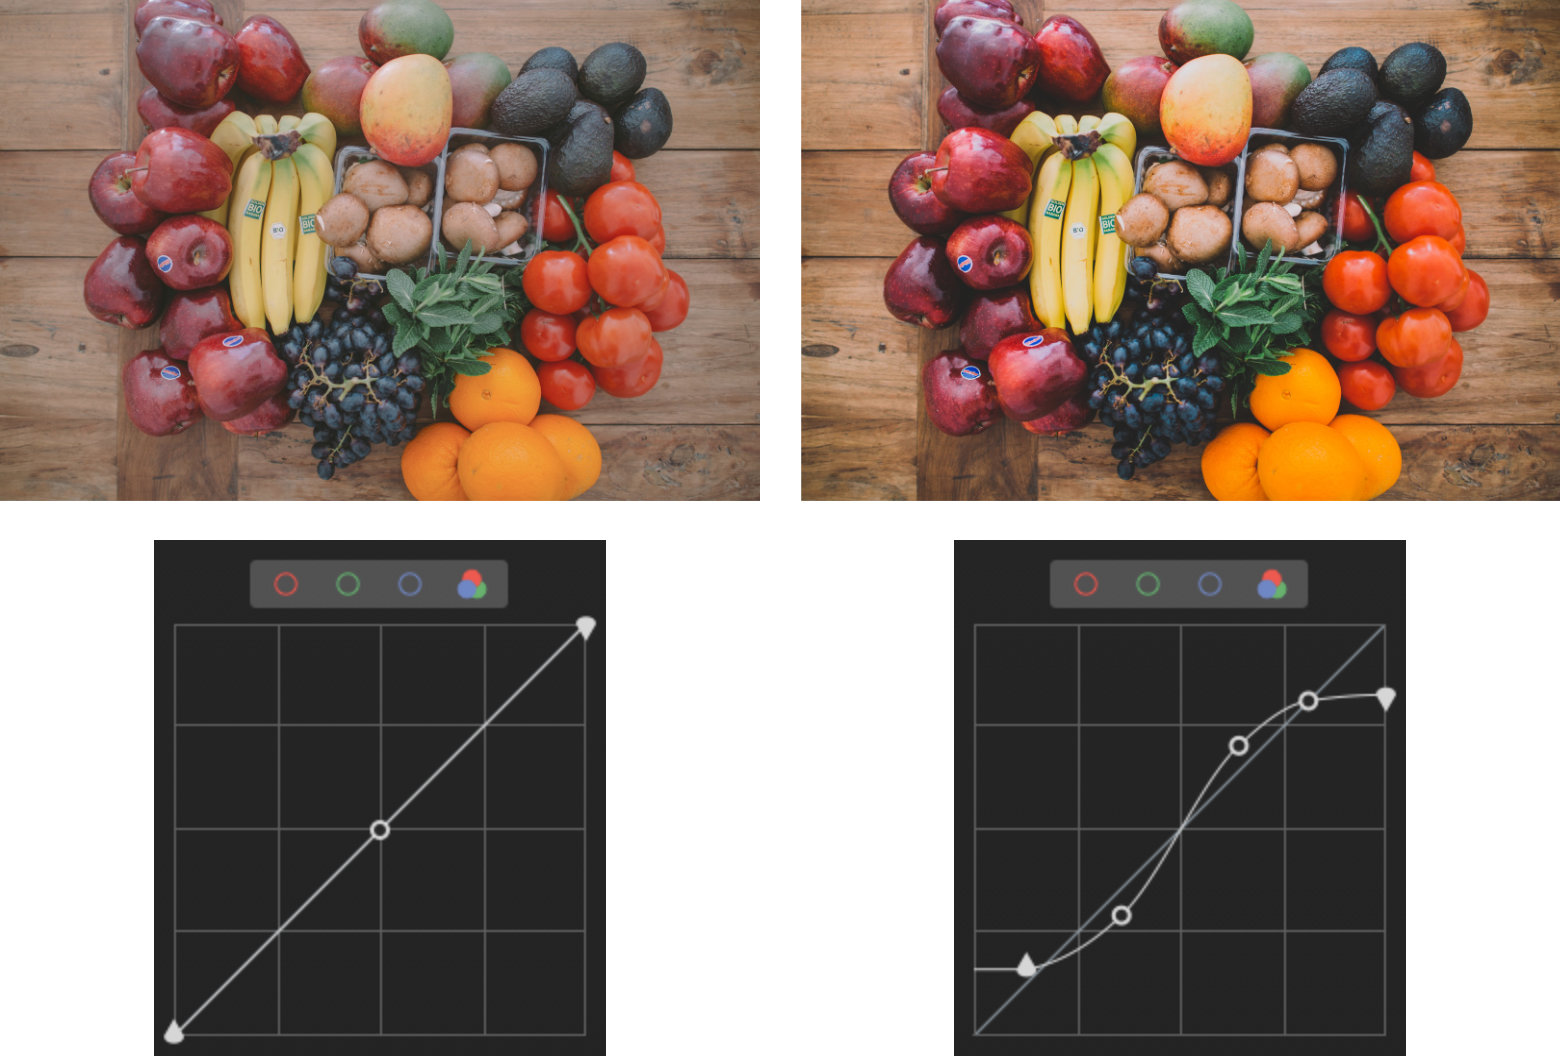
Curves Tool
The Curves tool provides you a way to design a very specific look by increasing or decreasing the color intensity of different regions in your photo. The Curves tool contains four curves, each defines a function that you can shape, where the horizontal and the vertical axes represent the input and the output tonal values respectively. Three of the four curves are applied on the red, the green and the blue channels, and the fourth curve is applied on all of them together in a manner that preserves color.
To shape a curve:
Select the channel whose curve you want to shape by clicking one of the four buttons near the caption Curves.
Drag a control point to adjust the curve shape. When you drag a point up, the regions whose colors are affected by this points are getting brighter. When you drag a point down you make those regions darker.
You can add additional control points by clicking a point on the curve with no control point.
You can double-click on a point to remove it.
While this may sound very technical, it's actually very easy to adjust. Simply try to move points and see how your photo colors are affected. Being one of the most expressive tools for color and tone adjustments, the curve tool serves as the base for many of the presets in Picktorial; thus, you can use it to refine existing presets.
Color Adjustments
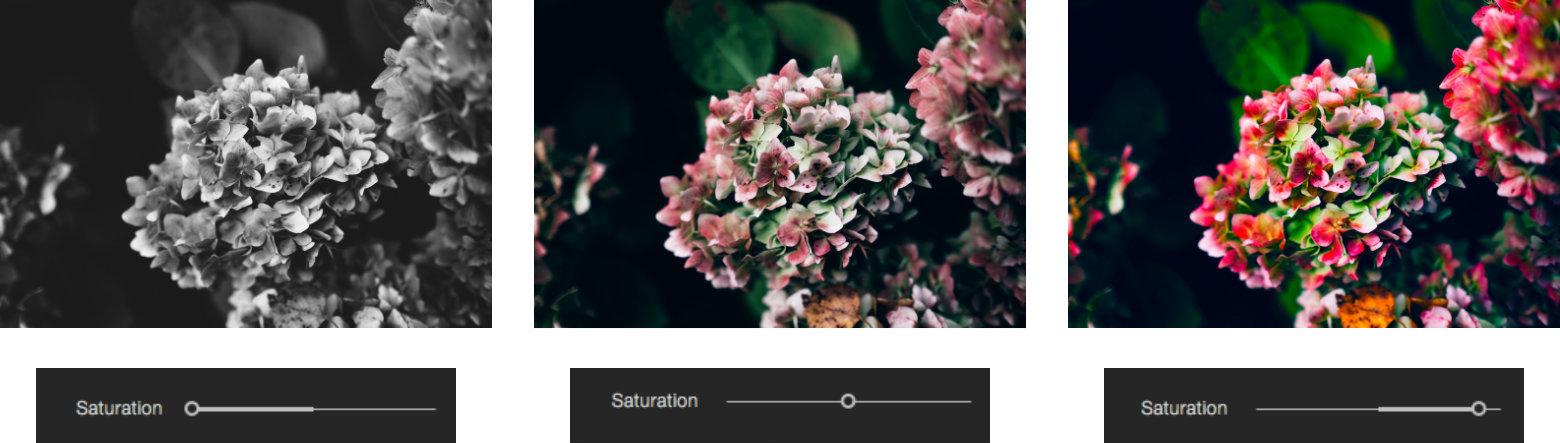
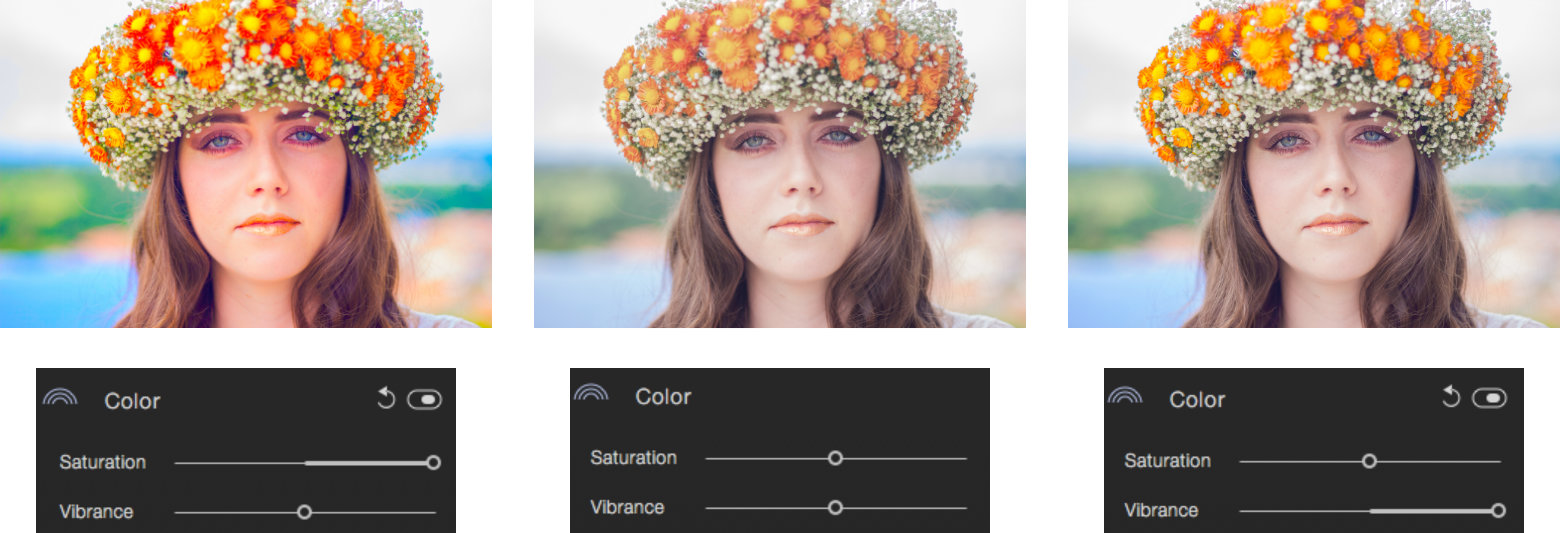
Saturation
Drag the Saturation slider to increase or decrease the weight of the chroma (color channels) relative to the brightness. Taking the slider all the way left will produce a black and white (grayscale) image. Dragging the slider to the right will emphasize the colors in the image.
Vibrance
The Vibrance tool is similar to the saturation tool but has a softer effect on skin-like colors.
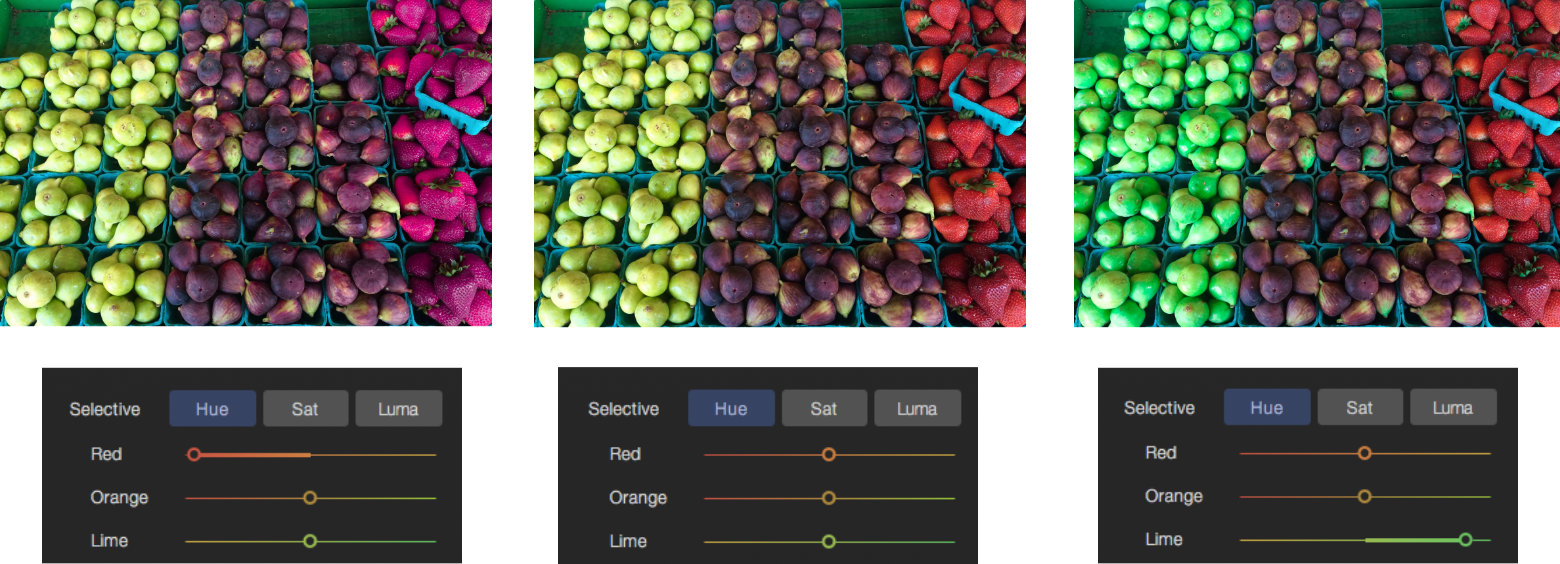
Selective Color
The Selective Color tool provides a way to adjust the brightness and the saturation of pixels according to their input hue.
Click the Hue, Saturation or the Luma tab to open the sliders for controlling the hue, saturation or the brightness respectively.
Use the sliders to adjust pixels of the corresponding hue.
For example, moving the Blue slider to the right at the Luma tab will increase the brightness of blue regions in the image. Moving the Red slider to the left at the Hue tab will give pink cast to red pixels.
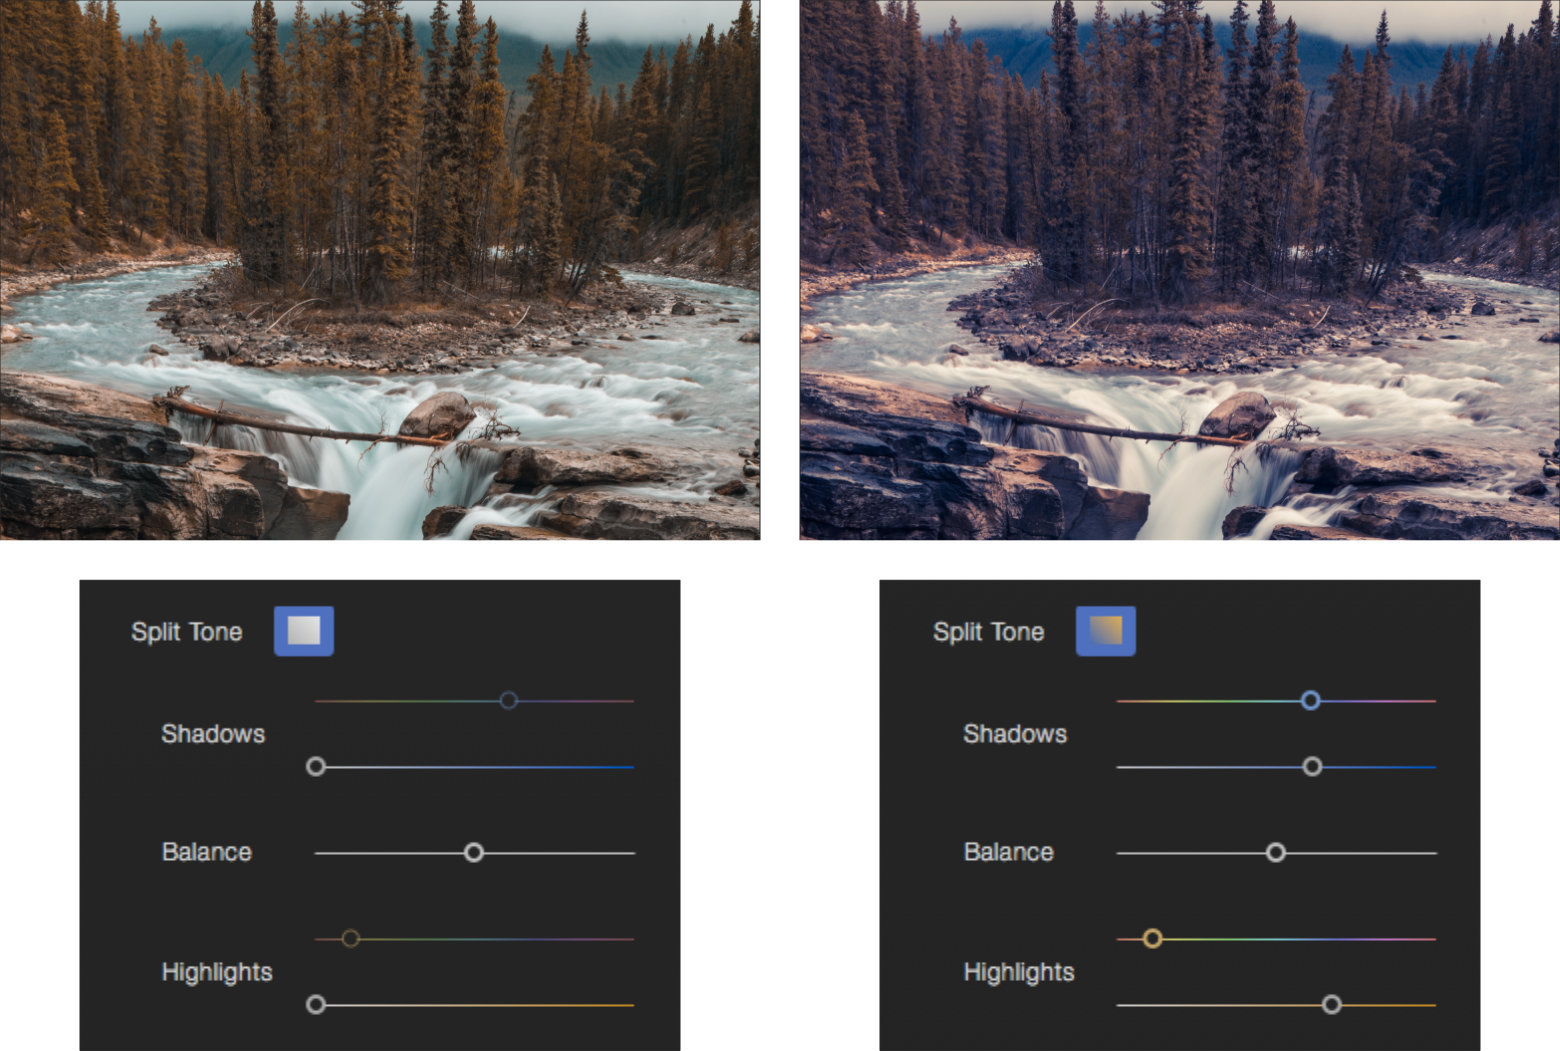
Split Tone
The Split Tone tool lets you add some color to bright and dark pixels separately. This may be useful in cases where a mixture of light temperature prevents you from achieving a single white balance correction with the Temperature and Tint tool. Another common usage is to achieve a special or film-like look.
Use the following steps to separately adjust the tone of highlights and shadows:
Click the Split button in the Color section to open the split tone tool.
Increase the saturation by using the second slider.
Change the hue using the first slider (the colorful one). This slider is disabled when its corresponding saturation slider value is zero.
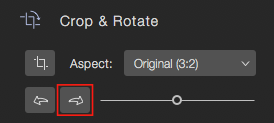
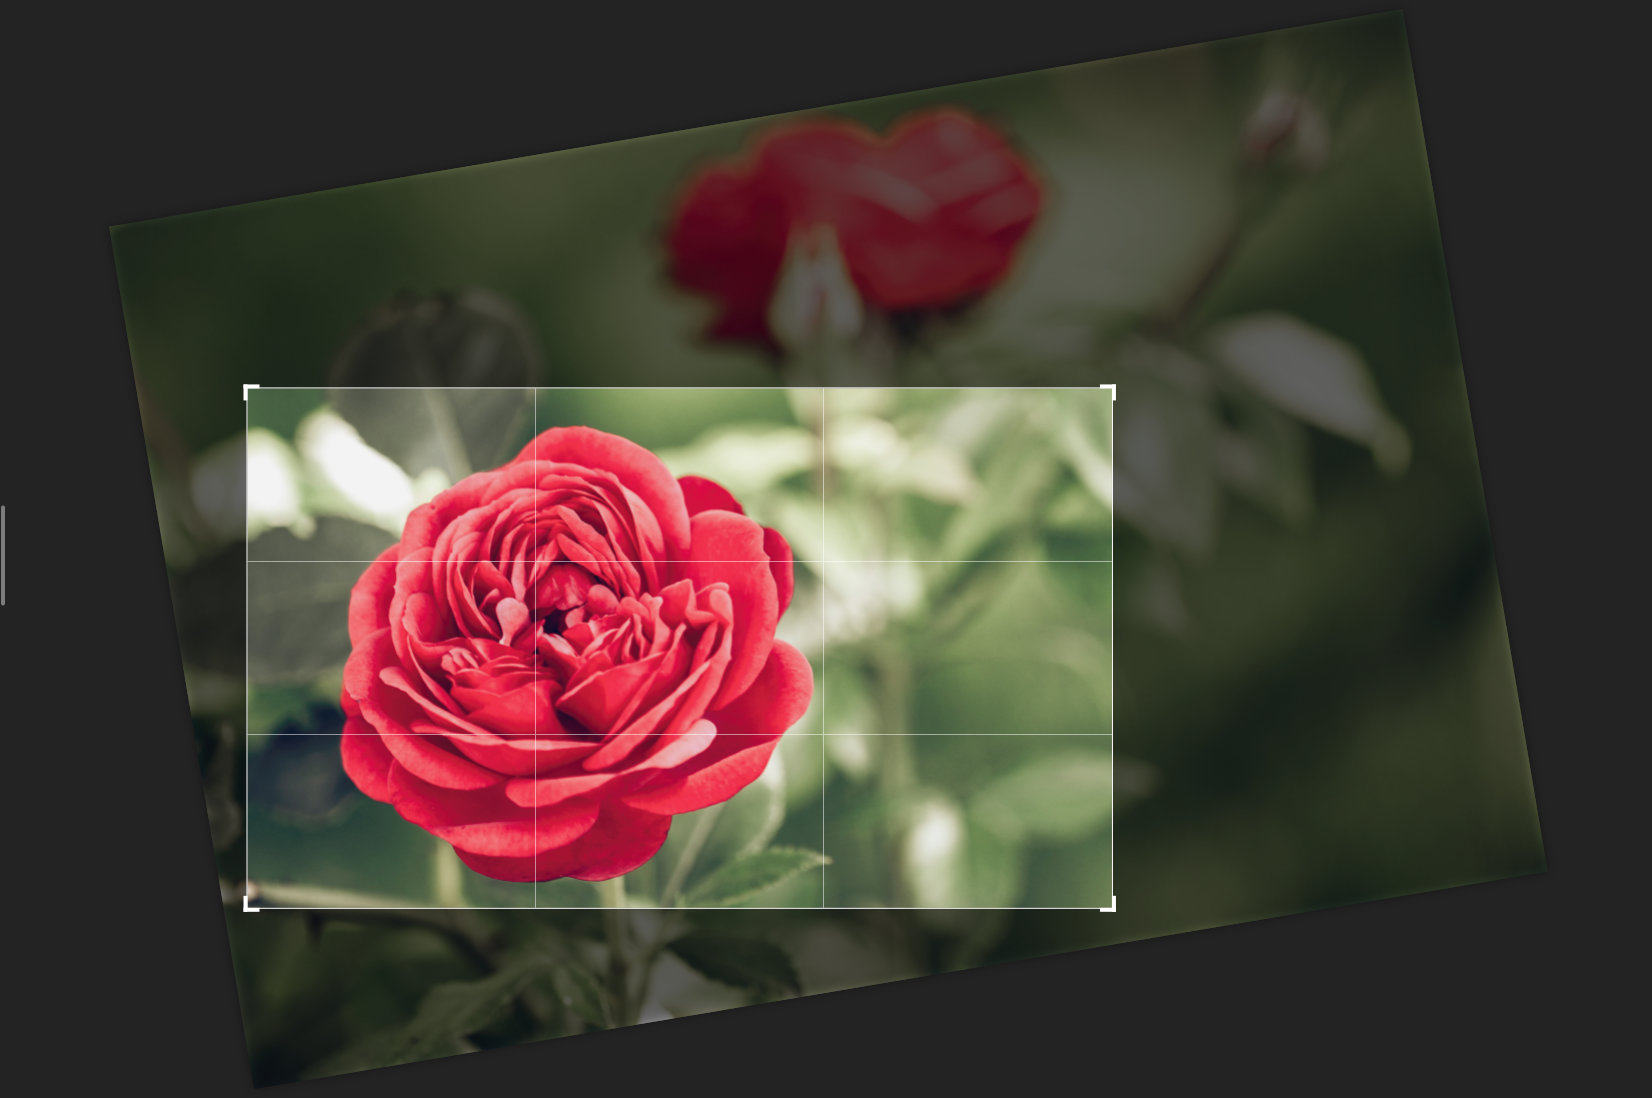
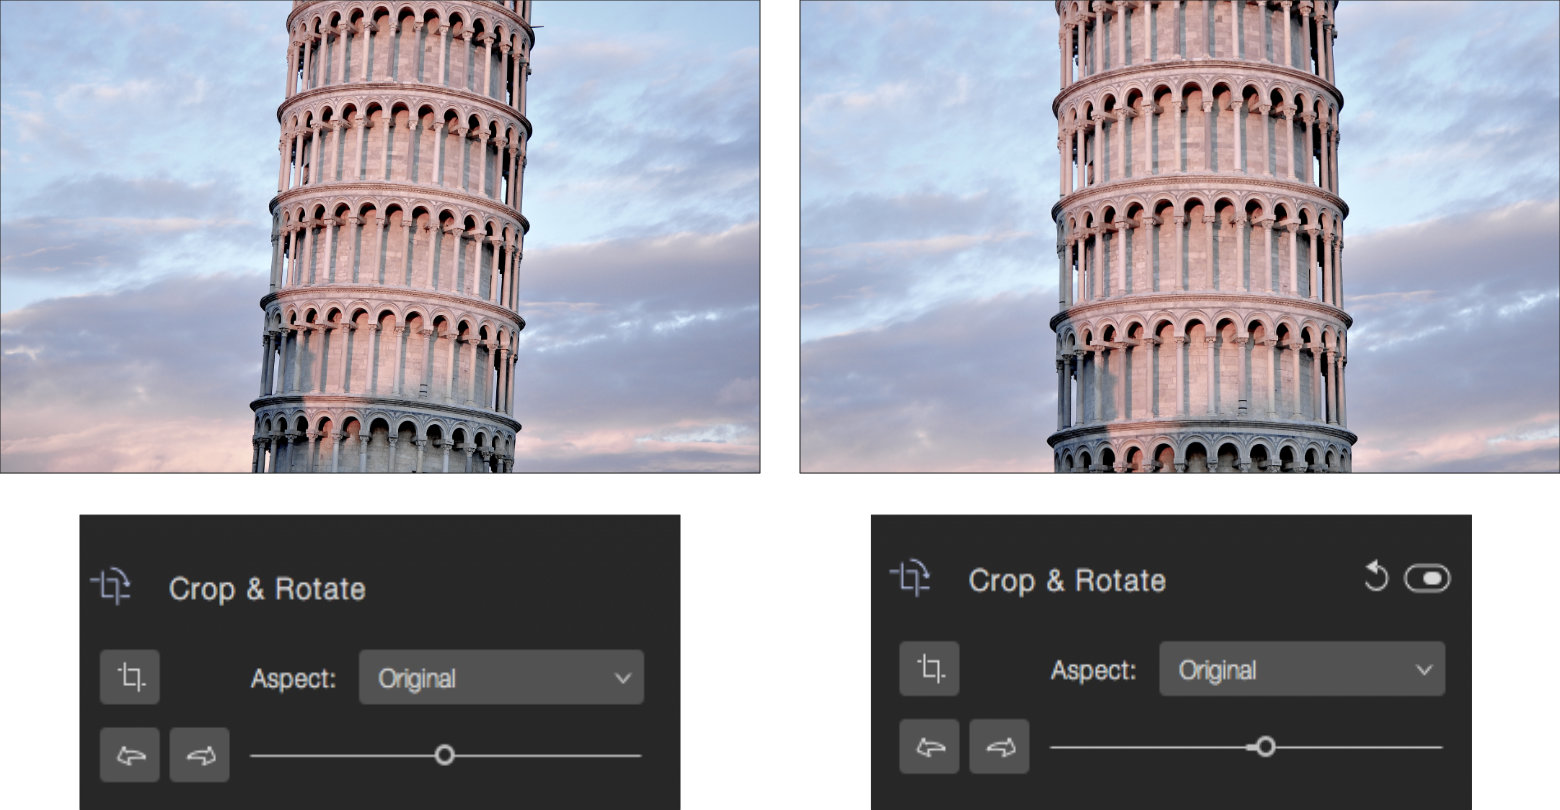
Crop, Rotation and Straighten
The crop, rotation and straightening tools are combined. When you straighten an image, the crop is automatically adjusted to match the image area. Therefore, it’s recommended to start by straightening the photo before cropping.
The straightening tool lets you rotate the image in up to 45 degrees (CW or CCW) while the Rotate tool rotates the photo in 90 degrees in every click.
To rotate an image
To change the orientation of the image, click the Rotate Left, or Rotate Right buttons.
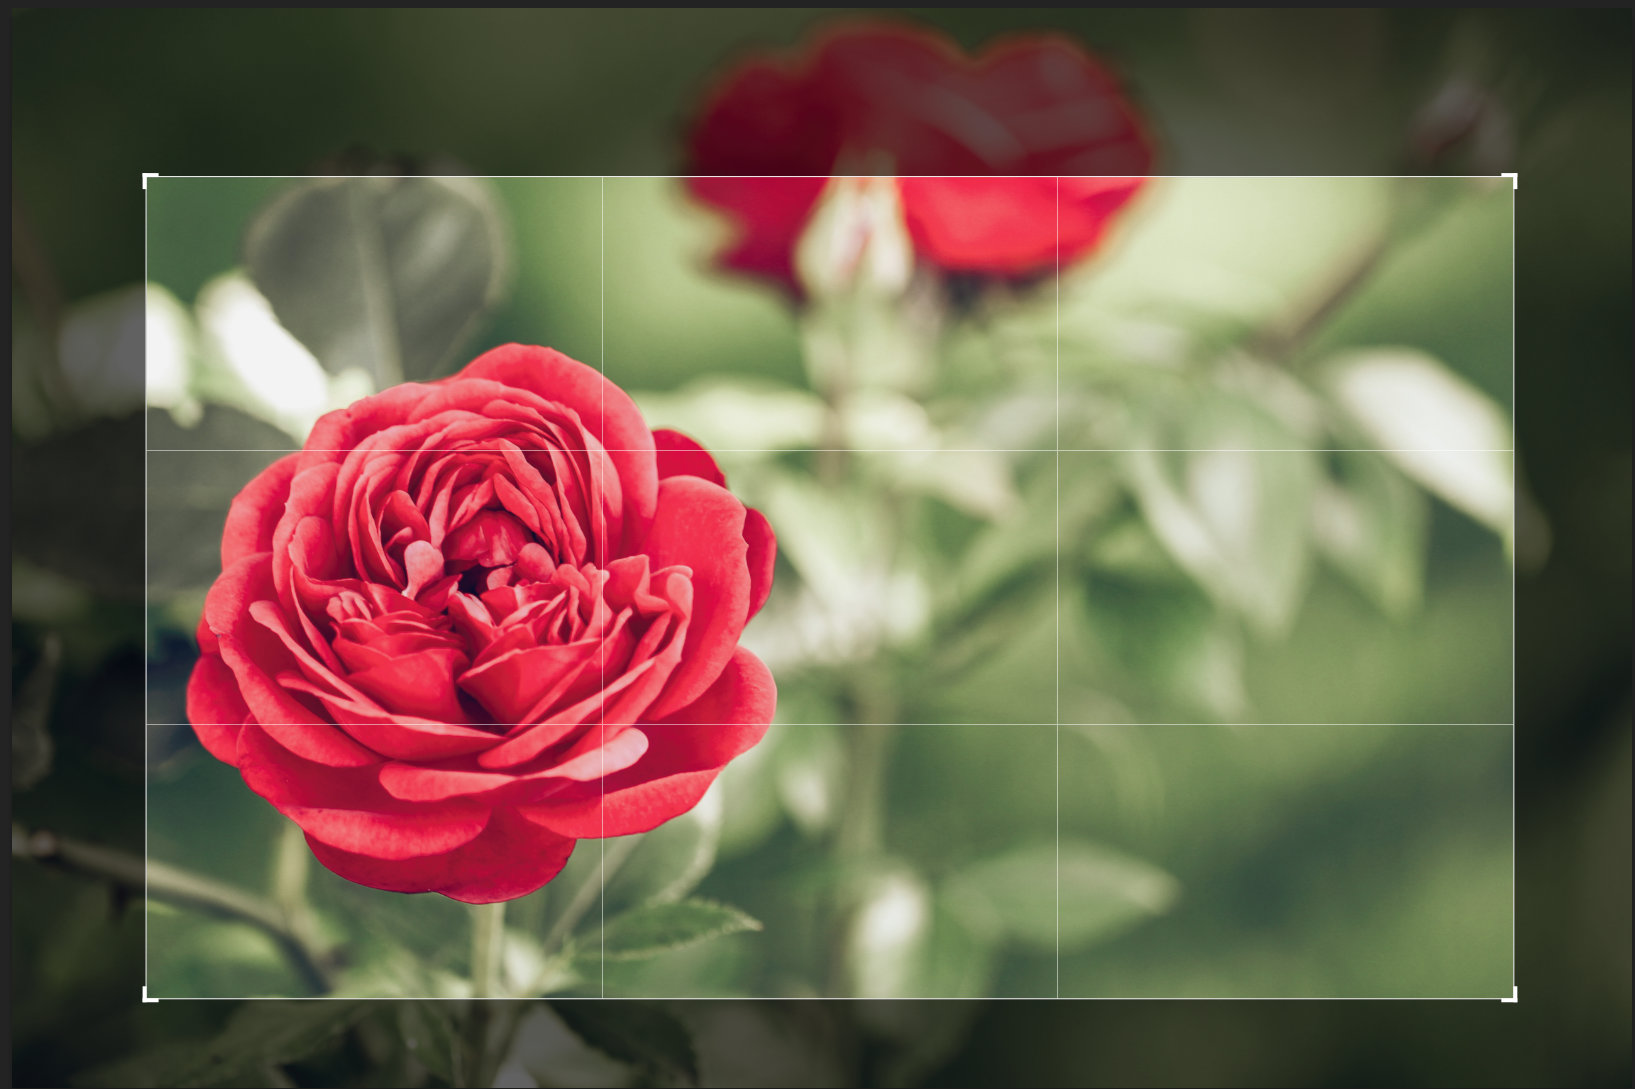
To crop an image
To set a crop rectangle that defines the target region you can manually define a crop rectangle:
Click the crop button under Crop & Rotate in the inspector pane.
Drag one of the corners to resize the crop area while preserving the current aspect ratio.
Drag one of the borders to resize the crop area without preserving the current aspect ratio.
Hold Shift while dragging a corner to temporarily unlock the aspect ratio.
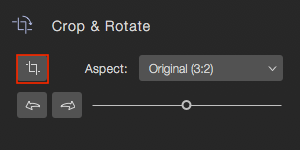
To select a predefined Aspect Ratio
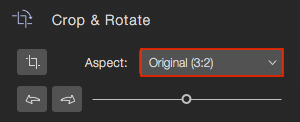
Click the aspect ratio list in the Crop & Rotate menu.
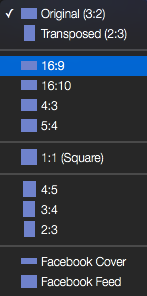
Select the required aspect ratio.
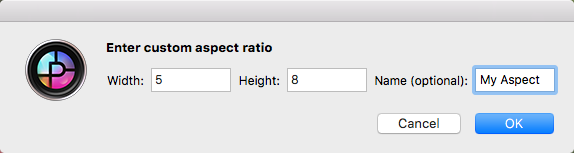
To define a custom Aspect Ratio:
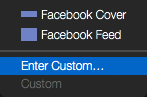
Select Enter Custom from the Aspect menu. Set the relative Width and Height and enter a name.
Click OK to save the new aspect ratio, it will appear in the list below Enter Custom for future usage.
Click the popup menu and select one of the predefined aspects or define your own (3:2 in the example) using the Enter Custom option in the Aspect menu.
To straighten a photo with the cursor:
Click the crop icon to start the process. Put the cursor near one of the corners and Drag it cyclically either clockwise or counterclockwise. The photo will be rotated on its center. If required it will be e shrunken or enlarged to keep the whole photo in the frame.
When you're done, click the Crop button again or press Enter.
Rotate and Straighten
To change the image orientation:
Click the arrow buttons in the editing pane to rotate the photo in 90 degrees clockwise or counterclockwise.
To straighten a photo:
Drag the straighten slider to straighten the photo.
When you are straightening a photo, Picktorial automatically crops the photo so it will not contain undefined pixels. You can customize this crop by setting a crop rectangle manually.
Applying Local Adjustments

Picktorial provides five types of local adjustment tools: Tone, Smooth, Sharpen, Denoise and Defocus. These tools can be found under the Retouch section and provide a way to adjust specific regions at the image. You can define multiple regions, each with different adjustments and edit each of these regions at any time without undoing regions that you defined later.
To define and adjust a region:
Choose the desired adjustment tool by clicking its button under the Retouch section:
- Tone
- Smooth
- Sharpen
- Denoise
- Defocus
The Patch will be discussed separately.
Specify the brush size and feather:
Set the brush size by moving the brush Size slider. Alternatively, scroll the mouse wheel (or swipe vertically with two fingers on a trackpad).
Set the brush feather by moving the Feather slider to control the soft-edged transition between the brushed area and the rest of the image. When you use the brush the distance between the dashed and the outer circle represents the feather amount.
Set the strength of the brush by moving the Flow slider. Lower values make build up effect of the brush slower, but inaccuracies are less noticeable.
Set the edge sensitivity with the Edge slider. The edge-aware property allows you to precisely select a region without going beyond the edges. The best practice is to brush without edge sensitivity when you brush inside large regions, and enable brush sensitivity when you brush nearby the region edges.
"Draw" by dragging over the image to apply the default setting on the drawn regions.
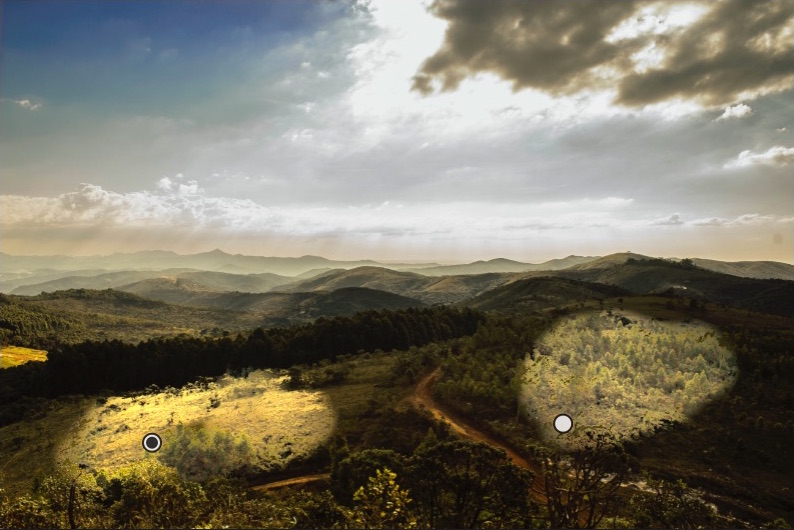
The left region, with the black point inside, is the active one, while the right region with the white point is inactive. A handle will appear in the point where you started to draw. When there are multiple regions defined by the same tool, you can use this handle to select the active region. Drawing, erasing and moving sliders will be applied to the selected region. If no region is selected, they will be applied to the next region being drawn.

To create a new region click the + button at the right-hand side of the Tone tool menu.
Move the individual sliders located under the selected tool to increase or decrease the values.
Click the Eraser button at the image footer to switch to erase mode. Drawing in this mode will delete from previously marked regions using the Brush tool. You can hold the Option key while drawing to temporarily switch between the two modes

Each region has a single mask, you can define by a combination of the following options:
- A Brush, to draw an adjustment mask.
- An Eraser, to erase from existing mask.
- Linear Gradient
- Radial Gradient
- Fill to apply the effect over the entire image.
- Clear to empty the current mask.
Extending Local Adjustments
Local adjustments lets you adjust specific parts of your image in different ways. It may be the subject that needs to pop out, or it may be the sky that needs some brightness attenuation after raising overall image exposure and so on. Often times, the basic Tone sliders would be enough for these tasks. But in some cases you may need more precise control and sophisticated tools to give your photos a top-notch look.
The extended palette of tools that appears in the Retouch > Tone tool is fully customizable. You can add tools like Curves, HSL, Split-Toning or any other global tool in Picktorial. You can add them ad-hoc or save them as a default palette for new local adjustments you make in the future.
The Patch Tool
The Patch tool can be used to remove unwanted spots and objects from an image, by seamlessly cloning other regions on top of them.
Removing a spot using a circular patch:
Activate the Patch tool by clicking the patch button or title under the Retouch section in the Image Inspector pane (if it's not already activated).
Drag the Brush Size slider at the button of the image viewer to specify the size of the brush. You can also change the brush size by scrolling the mouse wheel over the image.
Click on the region in the image that you want to remove.
Picktorial tries to find a source region.
Drag the source and the target regions to relocate them.
For circles, you can drag the circle boundaries to resize the circles.
Use the sliders under the Patch tool button to set the patch parameters:
Feather: Specifies the softness at the patch boundaries.
Opacity: Specifies the opacity of the source region.
You can also change these settings from the context menu opened by right-clicking a patch.
Define a non-circular Patch
Repeat the steps 1 and 2 as done for circular Patches.
You can also click and drag to remove a non-circular region.
For non-circular regions, Picktorial automatically "lift" the source region for you, so you just need to move the mouse and click again when you find a reference region that matches (the result is updated in real-time while you move or drag the reference region).
Working with multiple regions:
To define a new region, click the + button and define a new region as you did for defining the first region.
If you start to define a new region where no other region is defined, you don't have to click the + button before.
To select a previously defined patch, hold the Option key to display all regions and click the region you want to select. You will then be able to change its settings, relocate its source or its target region or extend it. Derived changed to patches defined later will be reflected immediately as if were done after making these changes.
To delete a patch:
Select the patch you want to delete.
Press Delete.
To delete all patches:
Click the Reset button at the Patch tool header row.
To extend an existing patch:
Hold the Shift key and start painting from the destination of the patch.
Working with presets
Picktorial offers you a dozens of default style presets that can use for a quick enhancement of your photos, or as a starting point for further edits. All presets are customizable, and you can also create your own presets.
To apply a preset to an image:
Open the Presets section at the Image Inspector.
Click a thumbnail to apply the represented preset.
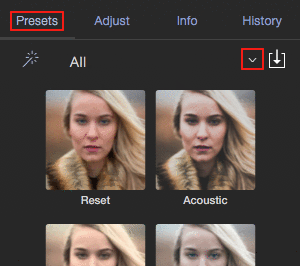
Scroll vertically to see more presets.
Click the arrow at the header and choose a category to narrow down the presented preset collection.
Experiment with different presets until you find the one that matches your desired look.
Lock Adjustments When Applying Presets
Specify which settings will be affected by applying presets.
By default, local adjustments and the main exposure and white balance settings are not affected from the presets being applied. To change this behavior:
Right-click on a tool or a slider to open its context menu.
Choose Lock When Applying Presets from the context menu.
Create a New Preset
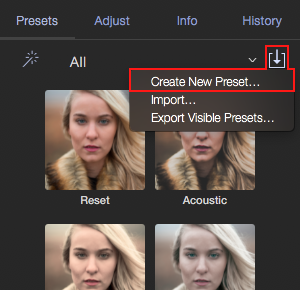
To create a new preset from the current adjustments:
Open the Presets tool menu, by clicking the Down Arrow button at the Presets section header.
Select Create New Preset...
Type a name for the new preset
Add tags to the new presets, so you can easily find it later when browsing presets with specific tags.
Click Create to save the adjustments as a new preset.
Optional: Right-click the new preset thumbnail and choose Export... to save the preset to a file that can be imported later into another computer.
Import Presets
Preset packs are provided in .ptpreset format to Picktorial.
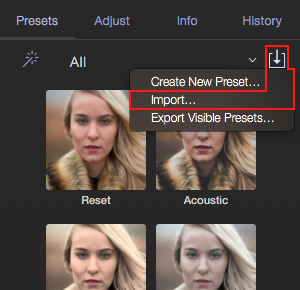
To import existing preset(s):
Open the Presets tool menu, by clicking the Down Arrow button at the Presets section header.
Select Import...
Select the .ptpresets file that you with to import.
You can adjust the imported presets according to your preferred style.
Histogram
Live Histogram
A Histogram is an essential tool in Photo editing. The histogram displays the distribution of the color intensity at each of the red, green and blue channels of the image. It provides an objective view over the tones of your image, and an additional way to evaluate the original image and your edits. Picktorial histogram is highly responsive, and is always live - even when using local adjustments, gradients and brushes.
The histogram plots the number of pixels for each tonal value. Based on the histogram you can judge the entire tonal distribution at a glance.
The horizontal axis of the graph represents the tonal variations, while the vertical axis represents the number of pixels in that particular tone. The left side of the horizontal axis represents the black and dark areas, the middle represents medium grey and the right hand side represents light and pure white areas. The vertical axis represents the size of the area that is captured in each one of these zones. For instance, the histogram for a very dark image will have the majority of its tones on the left side of the graph while the histogram for a very bright image will have most of its data points on the right side and center of the graph.
As a rule of thumb, it's usually desired to edit the image so the histogram will be balanced and cover the entire dynamic range. However, for creative reasons you may often find yourself deliberately violating this rule.
Clipping Indicators
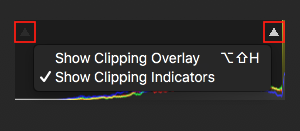
At the top of the histogram, you can find new Clipping Indicators. Each turned on if some values of the image exceed the highest or the lowest values in Picktorial working color space (which is ProPhoto RGB).
You can hide and show these clipping indicators by clicking on the image histogram and select Show Clipping Indicators.
Clipping Overlay
When clipping overlay is in the overexposed areas in the photo are red and the underexposed areas are blue.
At the top of the histogram, you can find new Clipping Indicators. Each turned on if some values of the image exceed the highest or the lowest values in Picktorial working color space (which is ProPhoto RGB).
You can hide and show these clipping overlay by clicking on the image histogram and select "Show Clipping Overlay" or press Option Shift H. (see above)